Craft for Kids: Popsicle Pen Holder

It’s Saturday!  Have a #SigeSabado #SigeSaMantsa day with your bulilits with this fun craft idea.

 photo SSpenholder-1.jpg

Got a pack of popsicle sticks in your kid’s craft box? Whip them out with some paint, glue, paper, and stickers for hours of fun.  Doll house, toy plane, trinket box, picture frame… you’ll never run out of things to do with popsicle sticks!  Make something useful and turn them into a pen holder just like we did.

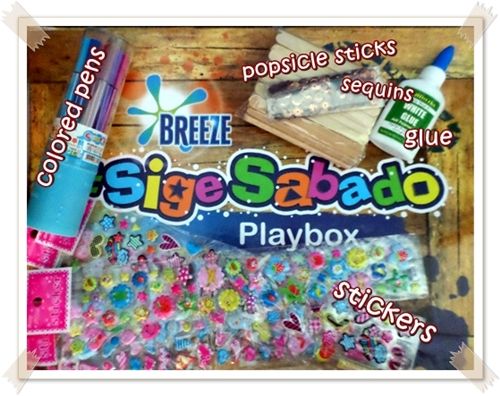
Here’s what you’ll need:

  • 1 pack of popsicle sticks
  • paper
  • paint
  • glue
  • stickers

 photo SSPHmaterials.jpg

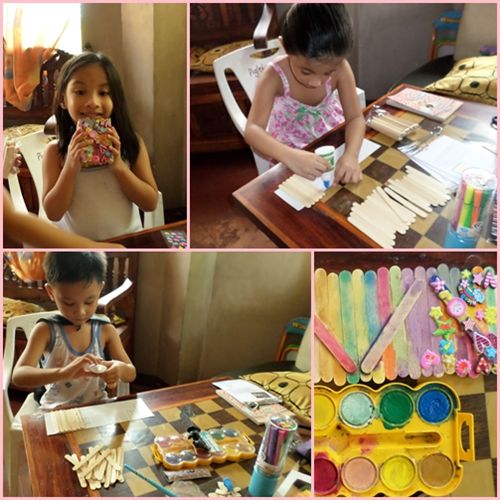
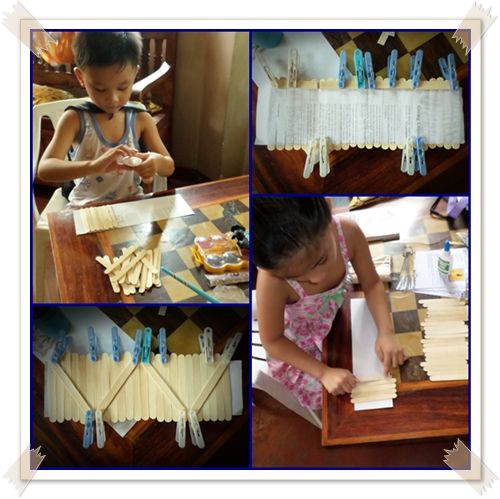
The first thing you need to do is measure the size of the penholder you want to make and count the number of sticks you’ll need.  Instead of gluing the sticks side by side, we cut a strip of paper and glued the sticks on it.  The kids glued 24 sticks so when we folded it into a rectangular prism, it had 6 sticks on each side. 4 more popsicle sticks were glued diagonally to reinforce the paper.  You can use any scrap paper for this since this will be hidden inside the pen holder.  To make sure that the sticks are glued well together, we clipped them with pegs until the glue was dry.

 photo SSPHstep1.jpg

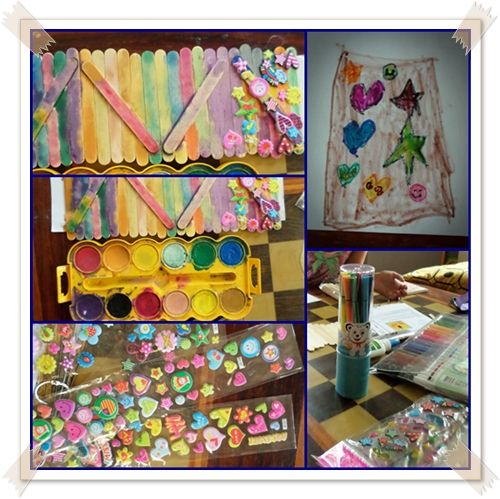
Once the glue is completely dry, decorate the sticks.  The kids decorated the entire length of sticks using colored pens, watercolour, stickers, and sequins.

 photo SSPHstep2.jpg

While waiting for the paint to dry, make the bottom part of the holder using left over popsicle sticks.  Again, we used paper and left an extra inch around the perimeter so we can glue it to the inside part of the pen holder.  With the paint all dry and the bottom ready, we assembled their penholders using glue and pegs to hold them together until the glue dried up.

 photo PopsiclePenHolder.jpg

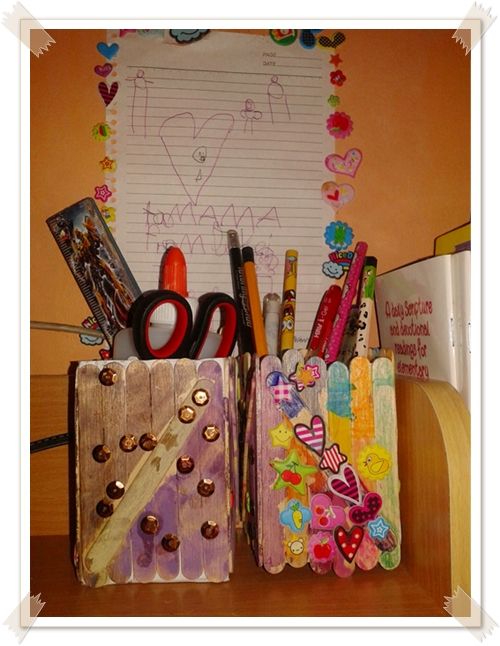
Mama’s work desk is so much prettier (and more organized!) with these two pen holders. <3

Creating a penholder is just one of the dozen things you can do with just a single pack of popsicle sticks. It doesn’t cost much either. You can get a pack of 100 for just under 50 pesos.  Care to share your craft ideas using these versatile sticks?  We’d love to hear about them so please do share away in the comment section below.

Click here for more #SigeSabado craft ideas

 photo SSbox-1.jpg


What Can You Do With A Paper Bag?

Do you have a Sophia the First or any other Disney princess fan in the house? Here’s a simple craft you can do at home to make princess play time more fun. AND, wait for it, it costs less than 30 pesos!

This craft was not one of our spur of the moment crafts.  The little girl had this planned since yesterday when she saw the “gems” in a fabric shop in the local market.  I was buying some extra clasps for her skirt when she asked if she could get some of the purple sew-on gems. She said that she absolutely needed them to make her crown and her necklace.  She asked for two big oval gems and six small diamond ones.  The gems and a meter-long of lace cost just 29 pesos in all.

When we got home, I had chores to do and wasn’t able to help her gather materials for her crafts.  What she did instead was “design” her Sophia the first crown and necklace.  The collage below shows her sketch of the accessories and dress and her finished crown and necklace.

 photo sophiacraft.jpg

Today, we were able to make all the stuff she needed for her Sophia the First play day.  I used one brown paper bag to make her crown.  The bottom part of the crown consists of three strips cut from the bag.  Jade colored it yellow and glued on the gems.  The other big gem was attached to the purple lace with tape.  When the glue was all dry, she put on her old purple dress (it was actually two sizes too small already) and got ready for her Royal play date with her brother Jakei. 🙂

 photo sophiajasmine.jpg

Care to share how you’ve used simple items at home to make your kids’ playtime more fun?

Halloween Fairy Costume: Paper Tissue Tutu

The little ones will be having a Halloween party in school this weekend.  The teachers will be transforming the school into Neverland and the kids are to come as fairies or pirates. Fairy and pirate costumes are fairly popular during Halloween are always available in stores so it would have been a cinch to get the little ones some costumes. However, there were specific instructions not to buy ready-made costumes.  We are to use our creativity and resourcefulness in making our kids costumes.  We are encouraged to mix and match existing clothes or to make the costumes ourselves.

I’m not really handy with the needle so sewing their costumes was out of the question.  Thankfully, I was able to find a no-sew guide on how to make a fairy or ballerina tutu using just a piece of garter and some tulle.  It was so easy to make that I was able to make one for my little Jade last Saturday night.  I didn’t even need to buy any materials to make it.   My Mom has a stash of paper tissues from bouquets she had received through the years which I thought would be a perfect substitute for tulle.   The garter was scavenged from an old raggedy pair of shorts.

Photobucket

Want to make this for your little one as well?  Here’s how I made my little girl’s tutu.

  1.  Measure your child’s waistline.  Cut the garter about two inches shorter than this and sew ends together.
  2. Fold paper tissue crosswise and cut into ¾-inch strips.
  3. Knot the strips, alternating colors, around the garter until you have a full tutu.

There, just three easy steps.  How simple can that be?!   This can even actually be done by grade schoolers who are already adept at using the scissors and doing simple knots.  I finished my girl’s tutu in just one afternoon.  Without any interruptions, you can actually finish a tutu in just an hour.


PLAYhouse preSCHOOL: Nature Tripping Week 2

Little Jade was down with the flu last week so we had to put off our lessons. This week, we continued our previous theme and the toddlers learned more about the different parts of a plant and the things they need to grow.  They learned to differentiate fruits, vegetables and flowers. They were also able to make a little garden of their own using scrap materials.

Music & Me Monday
Jade and I made up a song about what plants need to grow.  She loves singing the song during bath time.  She curls down and pretends to be a seed, gets up slowly and “grows” into a flower as I sprinkle water on her.  The lyrics and music changes each time as it is just one of our impromptu songs:

I’m a little seed, a pretty little seed. (Jade squats with head curled down)
Put me in some soil and pat, pat, pat. (Mama pretends to put Jade in a pot)
Place me where there’s sunlight and plenty of air.
Water me until I grow. (Mama pretends to water Jade – sprinkles water on her during bathtime)
Growing, growing, growing tall. (Jade uncurls and slowly stands up)
Now I’m a pretty little flower. (Jade sways from side to side, smiles, and exclaims, “I’m a flower!”

Thinking Tuesday
We answered some worksheets on counting from 1 to 20, completing patterns, and sorting. Jade has already mastered counting objects from 1 to 10 and has no difficulty recognizing numbers 1 to 10. She still needs more practice recognizing numbers from 11 to 20 though. When counting more than 10 objects, she would sometimes count an object twice so I taught her how to mark each item as she counts it. She’s able to complete ABAB and AABB patterns without difficulty but needs assistance with more complex patterns.  She was able to sort out the vegetables from the flowers without any help from me.

Jakei can already count by rote from 1 to 10 but can’t identify the numbers yet.  When asked to count a set of objects, he will always count up to 10 regardless of the actual number of objects.

Wonderful World of Wednesday
The little boy needed to be brought to his pedia on Wednesday morning so our art activity was rescheduled on Friday.  We made leaf imprints again, colored a picture using punched-out circles, and made our own little garden using scrap paper, used stirrers, stale ground coffee, and used plastic bowls.

Click here for the art activities we had this week.

Thursday Talkies
We answered worksheets from Homeschool Creations and 1+1+1=1 Tots School. I introduced rhyme to the toddlers using the rhyming words picture set from the Garden Preschool Pack. We finished off with a new set of plant-related words to enrich their vocabulary.

Again, these daily sessions last two hours at the most.  It takes the toddlers only about half an hour to finish the worksheets.  The rest of the morning is spent playing with their toys and reading books.

Our theme next week will be “What Can We See At the Zoo?”. If you have any ideas on how we can have fun learning about zoo animals, kindly share it with me.